
In Part 2 of this blog series we will look at deploying Azure Databricks. You can read an introduction to the technology in Part 1.

Installing Azure Databricks
Azure
The prerequisites for deploying Azure Databricks require, not unsurprisingly, that you have an active Azure subscription with enough funds and permissions. If you don`t have a subscription you can create a free trial via the following offer link - https://azure.microsoft.com/en-gb/free/
If you are in a corporate environment then it would be best to contact your IT support directly who will advise the best course of action. There could a subscription already set up that you simply need to access. Also bear in mind that a lot of corporate environments block external resources and it maybe that these need to be white-listed.
Azure Portal
Navigate to https://portal.azure.com/ and click on the "Create a resource" (shown as a Green + icon) or alternatively use the direct link.
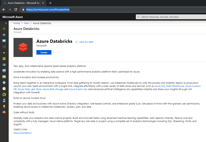
In the "Search the Marketplace" box start typing 'Azure Databricks' and select Azure Databricks from the dropdown or from the subsequent list. Next click the "Create" button shown in the following screenshot.
Next input a few key details.
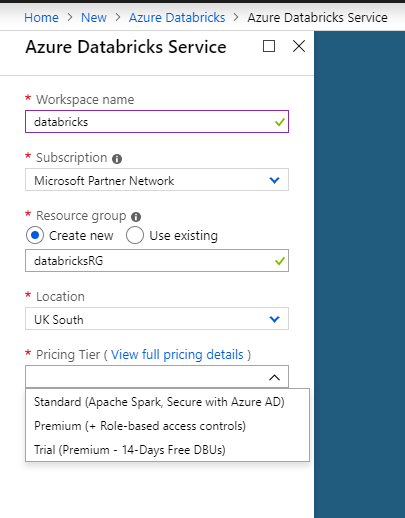
The workspace can be named anything you wish, but I would recommend keeping the same environment isolation boundaries you have currently in place. For example if you have dev, test and prod environments then you should create three workspaces.
The subscription will be specific to your environment and will show the default.
The resource group is a matter for personal preference, but should logically group the resources based on a agreed standard.
Make sure that you deploy it to the most appropriate location, which will either be where you have deployed any other resources or the one geographically closest to you.
Pricing Tier allows for three options: Standard, Premium and Trial. Current pricing can be gathered from the following link - https://azure.microsoft.com/en-us/pricing/details/databricks/
Premium offers Role-based access controls which you will more than likely want in a corporate environment.
The settings will look something like this.
- Workspace name: databricks
- Subscription:
- Resource group: databricksRG
- Location: UK South
- Pricing Tier:
- Deploy Azure Databricks workspace in your Virtual Network (Preview): No
I would recommend that you do not deploy into your own dedicated virtual network and instead keep the default setting of No. This default creates an additional managed resource group(s) and deals with all the interconnectivity that you need. If you are interested in this feature then please review the following. https://docs.azuredatabricks.net/administration-guide/cloud-configurations/azure/vnet-inject.html
Finally click create and then wait a few minutes while Azure Databricks is automatically configured and deployed.
Find out how to configure Databricks in Part 3 of this series.
