
When should you use Storage Pools for your Windows VM in Azure?
If you are creating a SQL Sever failover cluster instance (FCI) in Azure, you can use Storage Spaces Direct (S2D) and configure Storage Pools to set-up the Cluster Storage.
The other main reason for using Storage Pools in Azure is Performance, which is what we are going to talk about in this blog.

SQL Server disks performance guidelines
When you are configuring storage for SQL Server VMs you should always consider the below:
- Keep your databases' data and log files on separate disks
- Use read-only caching for data disks and no caching for log disks
- Create disks in the same region to avoid geographic delays
Now, each Premium SSD disk in Azure provides different performance depending on its size. This is measured in IOPS (I/O operations per second) or throughput (MBs per second):
| SSD size | Disk size in GiB | Provisioned IOPS | Provisioned Throughput |
| P1 | 4 | 120 | 25 MB/sec |
| P2 | 8 | 120 | 25 MB/sec |
| P3 | 16 | 120 | 25 MB/sec |
| P4 | 32 | 120 | 25 MB/sec |
| P6 | 64 | 240 | 50 MB/sec |
| P10 | 128 | 500 | 100 MB/sec |
| P15 | 256 | 1100 | 125 MB/sec |
| P20 | 512 | 2300 | 150 MB/sec |
| P30 | 1024 | 5000 | 200 MB/sec |
| P40 | 2048 | 7500 | 250 MB/sec |
| P50 | 4096 | 7500 | 250 MB/sec |
| P60 | 8192 | 16000 | 500 MB/sec |
| P70 | 16384 | 18000 | 750 MB/sec |
| P80 | 32767 | 20000 | 900 MB/sec |
So if you are planning to create a 4TB disk for your data files you could instead create a Storage Pool with 4 P30 disks and get the disks' combined performance:
- 1 P50 (4TB) = 7,500 IOPS – 250MB/s
- 4 x P30 (4TB) = 20,000 IOPS – 800MB/s
As you can see from the above example, you can achieve optimal performance having a Storage Pool with multiple disks rather than a single large disk. The gain could be significant depending on the size and number of disks in your pool.
A few gotchas and considerations to keep in mind when using Storage Pools in Azure:
- Consider your VM Size – Each VM size also comes with limits:
- Check your VM's IOPS and throughput limits because you can have the fastest Storage Pool in the world but once you reach your VM limit you're stuck and you're going to hit VM level throttling issues
- Type and number of disks – There is also a limit on the number of disks you can have per VM and some VM sizes do not allow Premium SSDs or caching.For example the “Standard D4s v3” supports Premium SSDs and storage caching, but it has a throughput limit of 256MB/s.
- Number of Columns – when you create your storage pool you are also configuring the number of columns, which is equal to the number of disks added at the Storage Pool creation. So if you create a storage pool with two disks, then you’ll have two columns. Every time you want to expand the Virtual Disk in your Pool, you will need to add a number of disks equal to the number of columns. It is important to keep this in mind because as mentioned above, each Azure VM has a maximum number of disks allowed, 32 in the VM size above.
- You should always use different pools for data and log disks to optimise the gain from the read-only cache. The disks in your data pool should be using read-only caching but those in your log pool should be set to none. So, create one pool for data and one for logs.
Creating a Storage Pool
Let’s say you are building a new SQL Server High Availability Group in Azure. You should configure the Storage Pools locally on each node before adding the servers into the Windows Server Failover Cluster (I've explained why later).
- Create 2 Premium SSDs in the Azure Portal for the data pool
- Attach the disks to the VM and set the caching option to read-only
- RDP onto the server and run the below Poweshell script to create the Storage Pool with the two disks and the Virtual disk. This will also create and format the new volume “G”
### CREATE STORAGE STORAGE POOL

$StripeSize = 65536
$allocationUnit = 65536

[array]$PhysicalDisks = Get-StorageSubSystem -FriendlyName "Windows Storage*" | Get-PhysicalDisk -CanPool $True

$DiskCount = $PhysicalDisks.count

New-StoragePool -FriendlyName "SQLDATAPOOL" -StorageSubsystemFriendlyName "Windows Storage*" -PhysicalDisks $PhysicalDisks | New-VirtualDisk -FriendlyName "SQLDATA01" -Interleave $StripeSize -NumberOfColumns $DiskCount -ResiliencySettingName simple –UseMaximumSize |Initialize-Disk -PartitionStyle GPT -PassThru | New-Partition -DriveLetter "G" -UseMaximumSize | Format-Volume -FileSystem NTFS -NewFileSystemLabel "SQLDATA01" -AllocationUnitSize $allocationUnit -Confirm:$false -UseLargeFRS
- That’s it! Your new G volume is ready to use. Repeat the same steps for the log pool remembering to set the caching option to none.
- Again, you should configure the Storage Pools on all nodes repeating the above steps before adding the nodes to the Cluster
- Finally, this is how you should add disks to a Storage Pool and expand the Virtual Disk
12345678910111213141516### ADDING DISKS TO EXISTING STORAGE POOL[array]$PhysicalDisks=Get-StorageSubSystem-FriendlyName"Windows Storage*"|Get-PhysicalDisk-CanPool$TrueAdd-PhysicalDisk-StoragePoolFriendlyName"SQLDATAPOOL"-PhysicalDisks$PhysicalDisks|Initialize-Disk-PartitionStyleGPT-PassThruGet-VirtualDisk"SQLDATA01"|Resize-VirtualDisk-Size(4000GB)#Choose virtual disk$VirtualDisk=Get-VirtualDisk"SQLDATA01"#Get its partition$Partition=$VirtualDisk|Get-Disk|Get-Partition| Where PartitionNumber-Eq2#Resize the Partition to its maximum size$Partition|Resize-Partition-Size($Partition|Get-PartitionSupportedSize).SizeMax
Creating a Storage Pool on existing WSFC
Now, things get a little bit tricky if you want to create Storage Pools on an existing Cluster. This is because the Cluster automatically discovers and take ownership of any new physical disks attached to a VM and the disks will be in the “Clustered Windows Storage*” storage sub system.
The other problem is that, whereas you can have local Storage Pools with a single disk, the minimum number of disks allowed for Cluster Storage Pools is 3 due to striping and parity requirements. This means that every time you expand the storage pool you must add 3 disks at the time.
Again, you should always configure local storage pools before the cluster is created, but let's assume that you were not aware of this and you now need to use Storage Pools due to performance requirements. There is a workaround:
- Create 3 Premium SSDs in the Azure Portal for the data pool
- Attach the disks to the VM and set the caching option to read-only
- RDP onto the server and run the below Poweshell to create the Storage Pool
12345678910### NEW STORAGE POOL$StripeSize= 65536$allocationUnit= 65536[array]$PhysicalDisks=Get-StorageSubSystem-FriendlyName"Clustered*"|Get-PhysicalDisk-CanPool$True$DiskCount=$PhysicalDisks.countNew-StoragePool-FriendlyName"SQLDATAPOOL"-StorageSubsystemFriendlyName"Clustered*"-PhysicalDisks$PhysicalDisks|New-VirtualDisk-FriendlyName"SQLDATA01"-Interleave$StripeSize-NumberOfColumns$DiskCount-ResiliencySettingNamesimple –UseMaximumSize |Initialize-Disk-PartitionStyleGPT-PassThru|New-Partition-DriveLetter"G"-UseMaximumSize|Format-Volume-FileSystemNTFS-NewFileSystemLabel"SQLDATA01"-AllocationUnitSize$allocationUnit-Confirm:$false-UseLargeFRS - You’ll find that this time the Storage Pool creation will take considerably longer, as the Cluster tries to add the Pool and Volume to the Cluster Storage, and the creation will eventually fail with a a similar error to the one below:

Running the below script or checking the failover cluster manager you can see that there is now a Cluster Pool but is in the failed state:


- You will need to remove the Storage Pool from the Cluster Storage in order to continue:
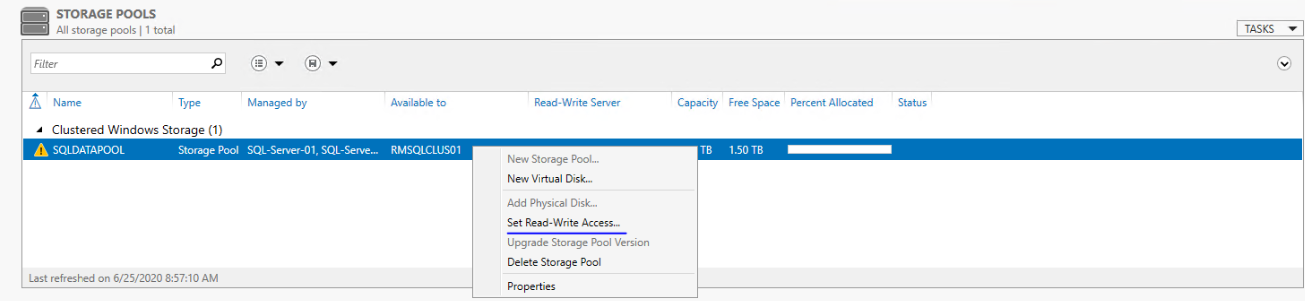
12345### REMOVE CLUSTER STORAGE POOL$ClusterPoolName= Get-ClusterResource|Where-Object{$_.resourcetype-eq"Storage Pool"} |SelectNameRemove-ClusterResource-Name$ClusterPoolName.Name - Now, because the cluster was the owner of the Storage Pool you need to set the Storage Pool's read-write access back to current node using Server Manager
- Once this is done, the warnings for the Storage Pool will disappear and you can create the Virtual disk:
123### CREATE VIRTUAL DISKNew-VirtualDisk-StoragePoolFriendlyName"SQLDATAPOOL"-FriendlyName"SQLDATA01"-Interleave$StripeSize-NumberOfColumns$DiskCount-ResiliencySettingNamesimple –UseMaximumSize |Initialize-Disk-PartitionStyleGPT-PassThru - This is going to take a little while and eventually will complete with errors again. The Cluster has now not only added the Storage Pool but also the Cluster Virtual Disk, both in the failed state

- Remove the Virtual Disk and Storage Pool from the Cluster in this order:
1234567### REMOVE VIRTUAL DISK AND POOL FROM CLUSTER$ClusterPoolName= Get-ClusterResource|Where-Object{$_.resourcetype-eq"Storage Pool"} |SelectName$ClusterVirtualDisk= Get-ClusterResource|Where-Object{$_.resourcetype-eq"Physical Disk"} |SelectNameRemove-ClusterResource-Name$ClusterVirtualDisk.NameRemove-ClusterResource-Name$ClusterPoolName.Name - Set read-write access to current node again as you did on step 6
- Attach the Virtual disk
123### ATTACH VIRTUAL DISKConnect-VirtualDisk-FriendlyName"SQLDATA01" - Format Volume and create the Partition
12345### FORMAT VOLUME AND CREATE PARTITION$diskNumber=Get-Disk|Where-Object{$_.FriendlyName-eq"SQLDATA01"}New-Partition-DiskNumber$diskNumber.Number-DriveLetter"G"-UseMaximumSize|Format-Volume-FileSystemNTFS-NewFileSystemLabel"SQLDATA01"-AllocationUnitSize$allocationUnit-Confirm:$false-UseLargeFRS - Work done! You can now see that the new local Storage Pool is healthy and the new Volume is ready to be used:

Conclusion:
You can really enhance your disks' performance by a correct use of Storage Pools in Azure. Plan your storage structure head to make the most of the Azure offering and avoid any surprises in the future.
