
Here we are again, I hope you’re already feeling like an astronaut or Carl Sagan exploring the Cosmos.
In my previous posts, we have seen basic concepts of No-SQL databases and how to start with Azure Cosmos DB, if you haven’t read those posts, I’d recommend you take a minute and check them.

Catching up from where we left off - we created our Azure Cosmos DB account and chose the API used to manipulate our data.
At this point we’re ready to go ahead and create our first database or graph, I will only focus on the SQL and Gremlin APIs from this point to show you how to create them from scratch.
Your First Database Using the SQL API
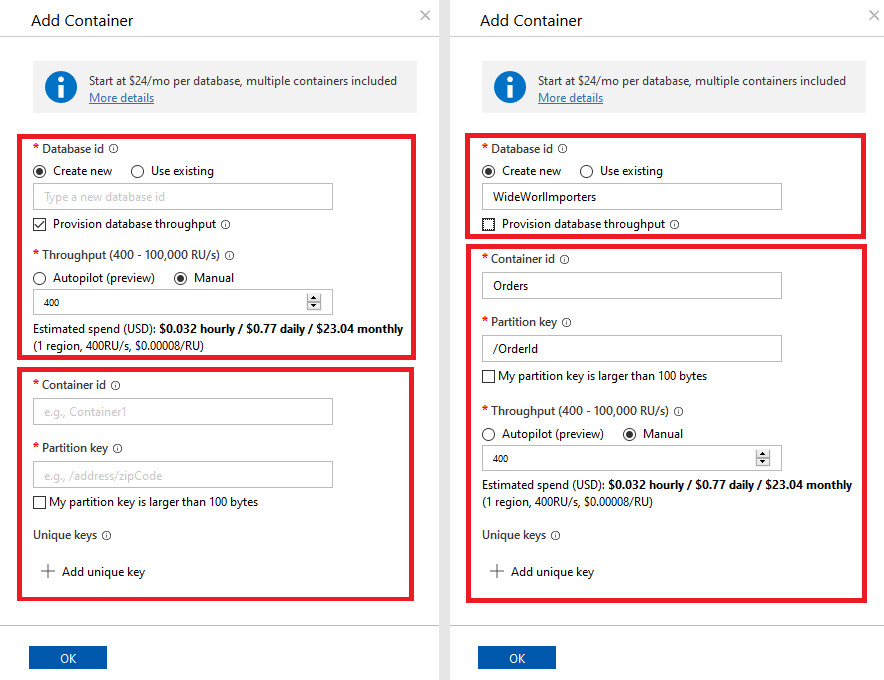
If your choice when you created your Cosmos DB account was to use the SQL API, you will be creating databases and containers, one database can have multiple containers.
Since the data (documents) will be stored in a container, it makes sense to create both at the same time. To create a container, we need to choose an existing database or to create one.
The most important settings to configure for our database and containers at this point are:
- Throughput
- Partition Key
Provisioning Throughput
We can provision throughput in the form of Requests Units per Second (RU/s), which are a combination of IO, Memory and Computing to the database level or to the container level:
- Database level: the throughput will be shared among all containers
- Container: the container will provision the specified amount of RU/s
*** While writing this post, Microsoft has announced a new tier called Serverless which will not have provisioned throughput per se and you will only pay for the RU/s you consume. It's expected to go in preview in the next month (Jul 2020). ***
If you’ll have multiple containers maybe some of them need dedicated throughput, but if there is only one it doesn’t really matter, all throughput will be to the only container.
Note that the scope of the throughput cannot be changed (database/container). So, if you chose provisioning Database Throughput, containers will share it as needed, unless you add a new container choosing to provision throughput and that will be added to the database and it will be what you pay for.
Another feature we can only opt in at the time of creation (recently released and still in preview) is one called Autopilot.
Auto Scale Throughput (Autopilot)
Autopilot allows Cosmos DB to automatically scale our databases or containers up and down in response to peaks in demand.
This option seems far more convenient if you have irregular or unpredictable access to your data and want to take advantage of higher throughput at peaks without having to write complicated logic to scale up and down.
The only gotcha here is that the minimum amount of RU/s (minimum charge) will always be 10% of the maximum RU/s with currently the following possibilities to choose from:
- 4,000 RU/s, min charge 400 RU/s, still within the free tier limit
- 20,000 RU/s, min change 2,000 RU/s
- 100,000 RU/s, min change 10,000 RU/s
- 500,000 RU/s, min change 50,000 RU/s
It is normal to not know what capacity we need to support our application[s], at the end of the day, we haven't created the database yet and most likely we don’t know what the demand will look like.
To help us with this task, Microsoft provides an online RU/s calculator where we can even upload a sample document to provide a more accurate forecast, but still we need to know how many documents we expect to read and write per second, so I see this feature as more helpful if we’re migrating an existing app (from a typical relational database) to this new platform.
Partition Key
In the first post of this series I mentioned the importance of the partition key as this will determine how well or badly our container can scale out and therefore, how much performance we will be able to get out of it.
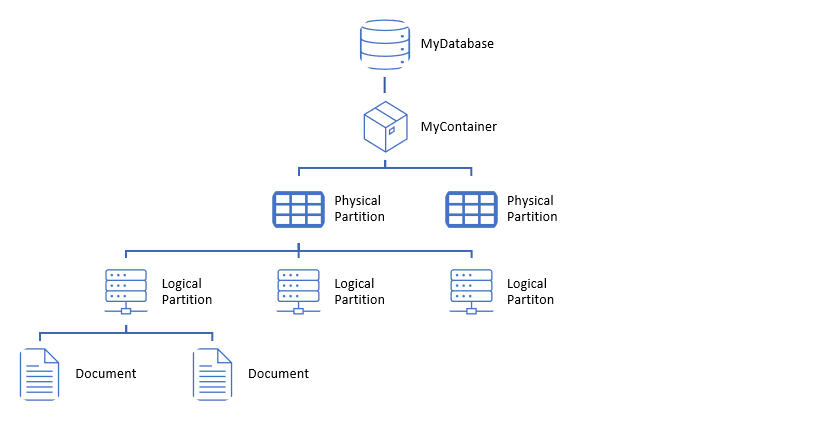
Data with the same partition key will be stored within the same logical partition. One or more logical partitions, will live in one physical partition. Remember this image?
First thing we need to ask ourselves (or the business) is what the expected access pattern will look like, is this container going to be heavy in writes or reads?
Choosing the wrong partition key can lead to hot spots and performance degradation. Just imagine a global online retailer choosing the OrderDate as partition key for a container where they will store Orders from their online store.
All orders placed in a day will end up in the same logical container. OK, now imagine Black Friday.
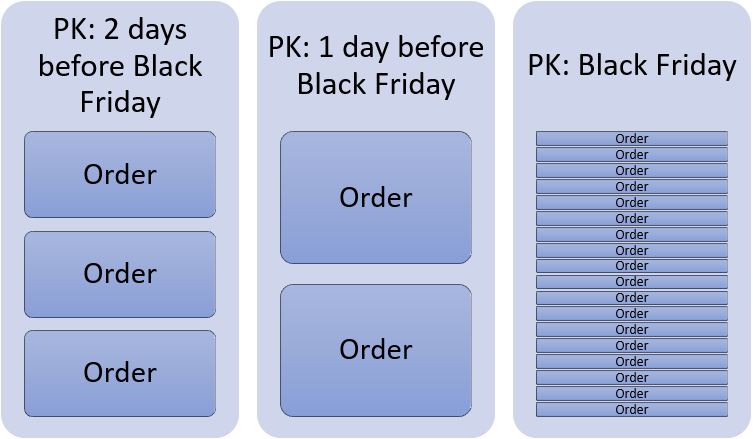
In this case, for Write heavy workloads, we would choose a value with high cardinality (as many different values as possible) to avoid bottlenecks which can also prevent us from using all the provisioned throughput, maybe the OrderID is a good choice as it should be unique.
On the other hand, if you were creating a ‘My Orders’ page, that will be read intensive, maybe partitioning the data by OrderID is not the best idea, because to retrieve all ‘My Orders’, CosmosDB will have to look on each and every partition to find orders that belong to the user (cross partition queries) and that is expensive in terms of RU/s.
For that other scenario (heavy on reads), you might want to choose the CustomerID as partition key, like this:
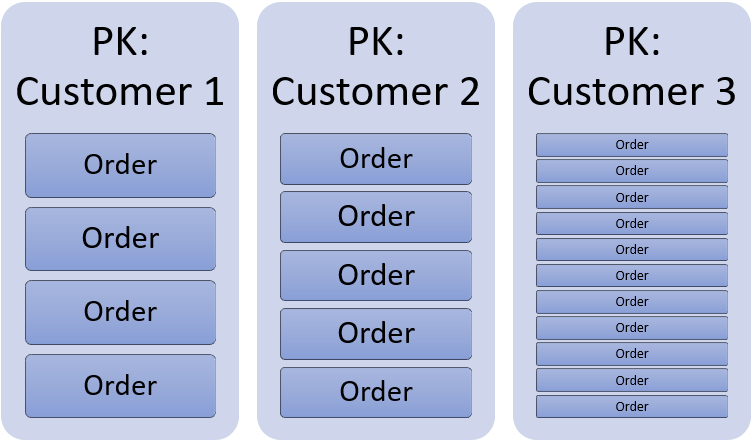
Each time a customer wants to see his or her purchase history, all data will be in the same logical partition, making that requests lighter in terms of RU/s and cheaper to run.
Conclusion
In this post, I showed you how to create your first Cosmos DB database using the SQL API and how you can configure throughput to adapt it to your workloads.
And we've seen again the importance of choosing the right partition key depending on the access pattern, so we don't run into bottlenecks.
Hope you enjoyed reading, thanks!