SQL Server provides two different forms of authenticating the users that connect to the database server: Windows Authentication, which is the default and preferred method, and SQL Server Authentication, which needs to be explicitly enabled.
There are reasons you might need to enable SQL Server authentication and, although advertised as less secure than Windows Authentication, there are still a few things we can do to minimise the risks.
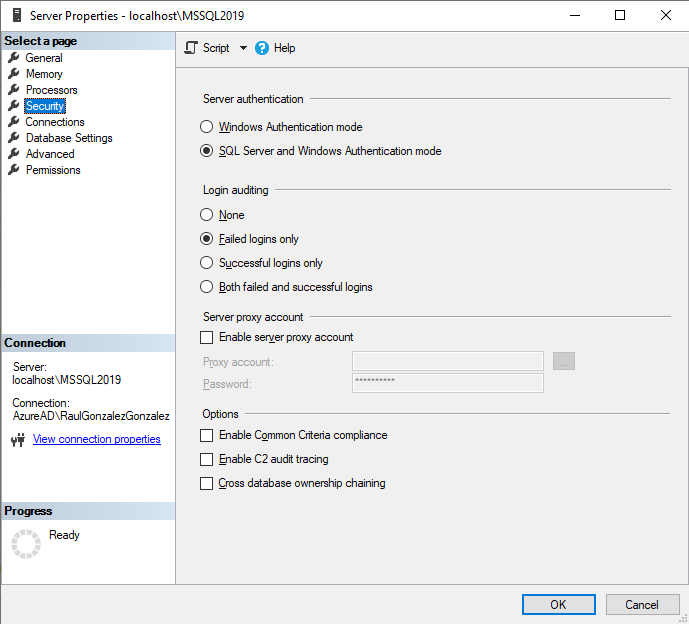
SQL Server Authentication needs to be explicitly enabled either during SQL Server installation, where we need to provide a password for the login [sa], or afterwards by changing the Server authentication method in the page “Security” under “Server Properties” dialog.
Alternatively, we can use T-SQL to modify the registry key where this is read from. A value of 1 will be for Windows Authentication and 2 for Mixed mode (SQL and Windows).
USE [master]
GO
EXEC xp_instance_regwrite N'HKEY_LOCAL_MACHINE', N'Software\Microsoft\MSSQLServer\MSSQLServer', N'LoginMode', REG_DWORD, 2
GO
Note that if you enable it post installation, you need to restart the SQL Server instance for this to apply.
Once our SQL Server allows SQL Server authentication we are, somehow, a bit more exposed to a malicious attack, so what can we do now?
- Disable [sa]
- Rename [sa]
- Enforce password policy (default on)
- Enforce password expiration (default off)
- User must change password at next login (default off)
Disable [sa]
This is considered best practice as [sa] always exist (when SQL authentication is enabled) and can be the most obvious target for a brute force attack.
USE [master]
GO
ALTER LOGIN [sa] DISABLE
GO
SELECT principal_id
	, name
	, sid
	, type
	, type_desc
	, is_disabled
	, create_date
	, modify_date
	, default_database_name
	, default_language_name
	, credential_id
	, owning_principal_id
	, is_fixed_role
FROM sys.server_principals
WHERE sid = 0x01
GO
Rename [sa]
Renaming [sa] can be a good option if we do not want to disable it. This way, as the name won’t be widely known, an attacker would need to find out the user name and figure out the password too.
This will not affect database users or jobs, for example, as what matters is the login's SID (always 0x01).
USE [master]
GO
ALTER LOGIN [sa] WITH NAME = [ww]

SELECT principal_id
	, name
	, sid
	, type
	, type_desc
	, is_disabled
	, create_date
	, modify_date
	, default_database_name
	, default_language_name
	, credential_id
	, owning_principal_id
	, is_fixed_role
FROM sys.server_principals
WHERE sid = 0x01
GO
Enforce password policy
If not specified, this would be enabled and specifies that the Windows password policies of the computer on which SQL Server is running should be enforced.
Enforce password expiration
By default SQL Server logins will not expire, if enabled this will get the configuration from the Windows Password policies.
User must change password at next login
SQL Server will ask for a new password on the first login, be careful if you are configuring a SQL login for an application.
SQL Server relies on Windows
You might have noticed that you can enforce security policies, but there is no way in SQL Server to configure them and they come from Windows from the server is running.
In other words, our system administrators are in control of what policies apply to SQL Server Logins, so we need work together with them and understand what those are.
Group Policy
Windows administrators know this tool well, as it really simplifies applying policies to all or a group of servers, users or more within a domain.
Configuring password policies at this level allows us to apply them to all [SQL Server] servers at once without having to do it one by one. That is not only easier, but also more consistent.
Let’s see how you can do this.
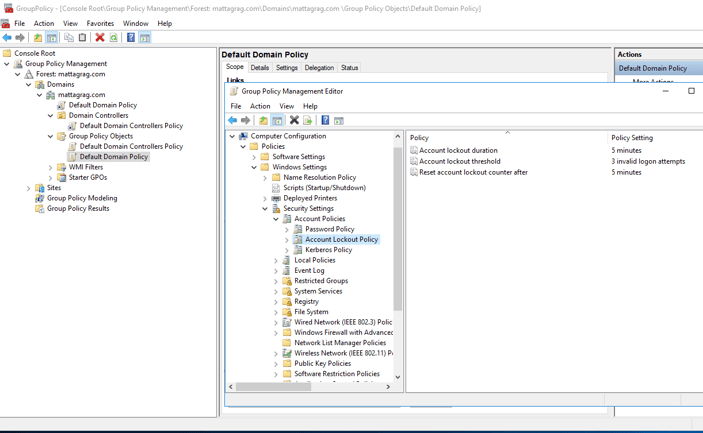
Connect to your domain controller using “Group Policy Management” tool and select where you want to configure your policies. In my case I want it to apply by default to all domain.
Open the “Group Policy Management Editor” and set the values you want. In my case, as I only want to test it, the values are very relaxed. In a more strict environment, you might want to lock accounts for a longer period so an administrator can review before allowing it to log in.
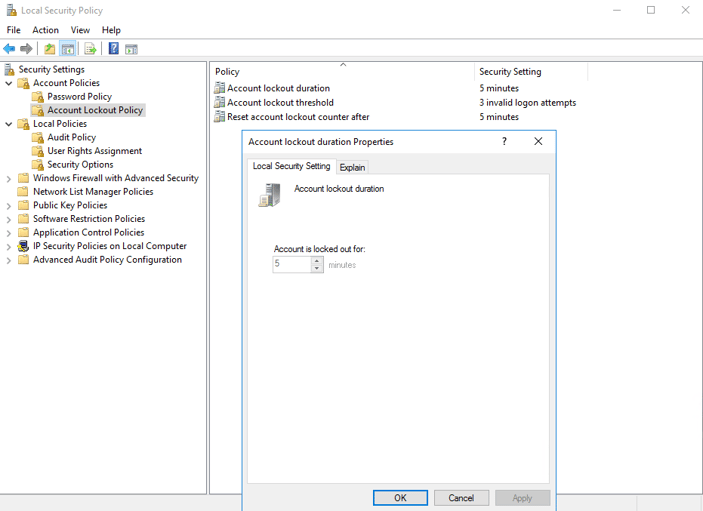
Once we have configured the Group Policy we can see that it applies to the server we run SQL Server on and we can see it in the ‘Local Security Policy’ and we can’t overwrite the settings as they come from Group Policy. If you're doing this in a computer that's not joined a domain, this is the place to go.
Back to SQL Server
Once we have our Security Policies in place, we can see how they apply to SQL Server logins.
In SSMS, let’s create a new login called ‘LockMe’:
IF SUSER_SID('LockMe') IS NOT NULL BEGIN
	DROP LOGIN LockMe
END
GO

-- Create unsecure login
-- Execute SQLCMD
CREATE LOGIN LockMe WITH PASSWORD = 'Secure*Password*123$', CHECK_POLICY = OFF
GO

-- Try to connect using a wrong password, execute this 3 or more times
:CONNECT MATTAGSQL01\MSSQL2017 -U LockMe -P Wrong.Pass
See that it doesn’t matter how many times we try to connect using the wrong password, the login will not be locked as the security policies do not apply and therefore we would be exposed to a brute force attack.
IF SUSER_SID('LockMe') IS NOT NULL BEGIN

-- Check if the login has been locked
SELECT LOGINPROPERTY('LockMe', 'isLocked') AS isLocked
	, LOGINPROPERTY('LockMe', 'LockoutTime') AS LockoutTime
Let’s now recreate the login enforcing the security policies:
IF SUSER_SID('LockMe') IS NOT NULL BEGIN
	DROP LOGIN LockMe
END
GO

-- Create secure login
CREATE LOGIN LockMe WITH PASSWORD = 'Secure*Password*123$', CHECK_POLICY = ON
GO

-- Try to connect using a wrong password, execute this 3 or more times
-- Execute SQLCMD
:CONNECT MATTAGSQL01\MSSQL2017 -U LockMe -P Wrong.Pass

-- After being locked, it won't work
-- Execute SQLCMD
:CONNECT MATTAGSQL01\MSSQL2017 -U LockMe -P Secure*Password*123$
-- Check if the login has been locked
SELECT LOGINPROPERTY('LockMe', 'isLocked') AS isLocked
	, LOGINPROPERTY('LockMe', 'LockoutTime') AS LockoutTime
	, GETDATE() AS [Current Date Time]
Once the account is locked we will get the login fail message regardless we use the right password.
After 5 minutes (as defined) we see the login is no longer locked and we can log in again (with the right pass of course 😊).
Conclusion
In this post I showed you how we can make our SQL Server servers a little bit more secure and prevent brute force attacks by using a combination of Windows and SQL Server features.
Hope you learned something today or at least enjoyed reading.
Thanks!


