
 This series will cover the following three Advanced Windows Failover Cluster Options with SQL Server AlwaysOn availability group configuration to demonstrate how they differentiate from one another and how they work.
- Active Directory Detached Cluster.
- Domain Independent Windows Failover Cluster.
Episode 1, Windows Active Directory Detached Cluster with SQL Server Basic Availability Group
Part of the Advanced Windows Failover Cluster Options with SQL Server AlwaysOn availability group series, this blog article covers the caveats, why, and how to configure both Windows Active Directory Detached Cluster with SQL Server Basic Availability Group. As the only real workload for which this is a good fit is SQL Server clusters that do not leverage Kerberos.
I once worked with a client in the financial sector who had to tightened security to comply with regulations; all changes and new implementation requests had to be approved by the headquarters abroad. The client required a disaster recovery solution, and after discussing, scoping, and refining the requirements, the available options for both Windows Failover Cluster and SQL Server were discussed, including the advantages and disadvantages.
However, the traditional Windows Failover Cluster was not viable as the provisioning required the computer objects to be pre-staged in Active Directory and DNS or create computer objects and read all the properties permissions.
Therefore, the architecture for the solution consisted of Active Directory Detached Cluster with SQL Server Basic Availability Group as SQL Server 2016 Standard Edition was in use.
What limitations do I need to be aware of?
There are several limitations as detailed below that make this solution suitable for limited circumstances. Also, there are limitations for basic availability group that must be taken into consideration, but these are outside the scope of this article.
- The available witness resources are disk and cloud witness (new in Windows Server 2016). However, disk can be problematic since with an availability group there are typically no shared disks.
- To deploy an Active Directory-detached cluster, you must use Windows PowerShell rather than failover Cluster Manager. But it can then be administered using the Failover Cluster Manager.
- The Active Directory Detached Cluster uses Kerberos authentication for intracluster communication. However, when authentication against the cluster network name is required, the cluster uses NTLM authentication. Thus, if Kerberos is a requirement for your environment, you must deploy a standard WSFC, as Active Directory-Detached Cluster with Basic Availability Group via certificate is probably not an option.
- While a listener can be configured, it must be registered in DNS to be usable. There is no Kerberos support for the listener either.
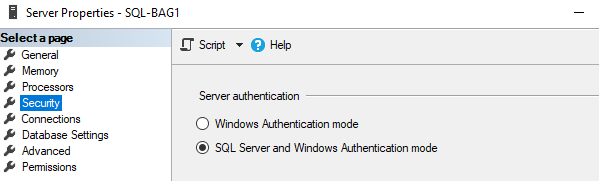
- Applications connecting to SQL Server should solely use SQL Server authentication.
- SQL Server failover clustered instance (FCI) is not supported with Active directory detached cluster.
- Certificates must be used for configuration of the AlwaysOn Availability Group to allow the end points to communicate.
- BitLocker Drive Encryption is not supported.
- Cluster-Aware Updating (CAU) in self-updating mode is not supported.
- You cannot copy a clustered role between failover clusters that use different types of administrative access points.
- You can set the type of administrative access point only when you create the cluster. You cannot change it after the cluster is deployed.
- All servers must be running Windows Server 2012 R2 or newer.
- All servers must be joined to the same Active Directory domain.
- All servers must have the Failover Clustering feature installed.
- Cluster service ports must be opened between the nodes.
- All servers must use supported hardware and the collection of servers must pass all cluster validation tests.
How to deploy an Active Directory-detached cluster
Before creating the failover cluster, make sure that all servers that you want to add as cluster nodes meet the prerequisites.
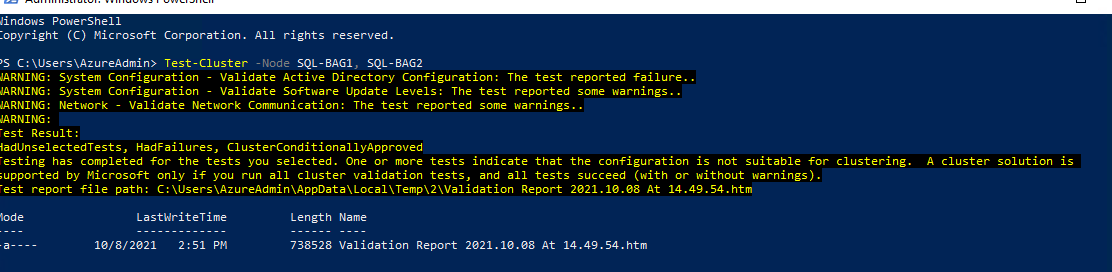
Step 1: Windows Failover Cluster Verification
The following step must be followed for all Windows Failover Cluster setup regardless the cluster type.
# Validate the cluster configuration (Optionally, from the failover cluster manager)
Test-Cluster –Node SQL-BAG1, SQL-BAG2

IMPORTANT: Make sure to review and resolve any reported issues prior to deployment.
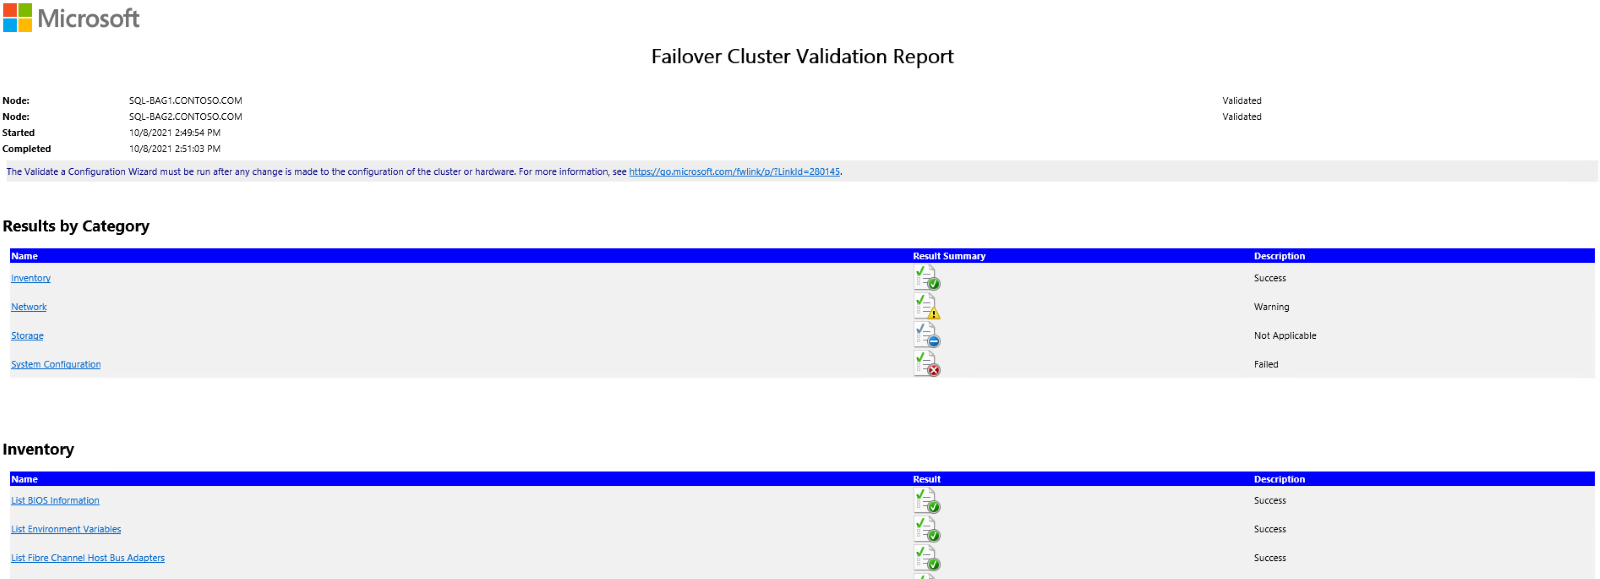
Failover Cluster Validation Report example
Step 2: Active Directory-Detached Cluster Creation
TIP: Prior to deploying a multi-subnet cluster make sure to confirm compatibility of the application as legacy applications may not support a multi subnet cluster.
# New Cluster with administrative access point of type DNS
# The cluster network name SQLBAGCLU will be created without a computer object in AD DS. In addition, all subsequent network names for clustered roles will be created without computer objects in AD DS.
New-Cluster -Name SQLBAGCLU –Node SQL-BAG1, SQL-BAG2 –StaticAddress 10.10.0.5 -NoStorage –AdministrativeAccessPoint Dns

For multi-subnet cluster setup make sure to specify the additional IP addresses. Note: with the distributed network name (DNN) introduced in Windows Server 2019 you will find a difference in allocation of IP address for Azure based configurations even when specifying the IP address part of the configuration. The default behaviour can be changed but is outside the scope of this article.
IMPORTANT: Remember to configure or add witness voting as part of best practices. In this example, the witness has been purposely left to demonstrate the dynamic quorum voting that had been introduced in Windows Server 2012. With dynamic quorum management, it is also possible for a cluster to run on the last surviving cluster node. By dynamically adjusting the quorum majority requirement, the cluster can sustain sequential node shutdowns to a single node.
Step 3: Verify the type of administrative access point for the failover cluster.
(Get-Cluster).AdministrativeAccessPoint

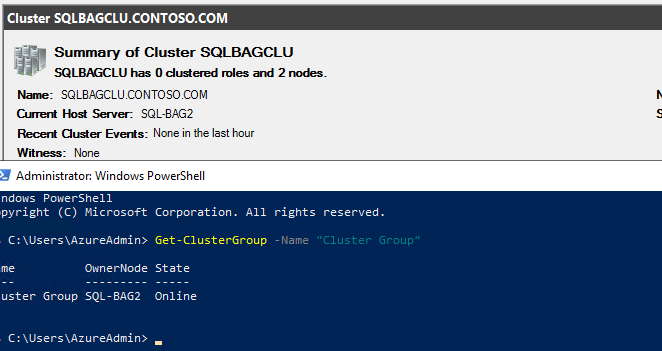
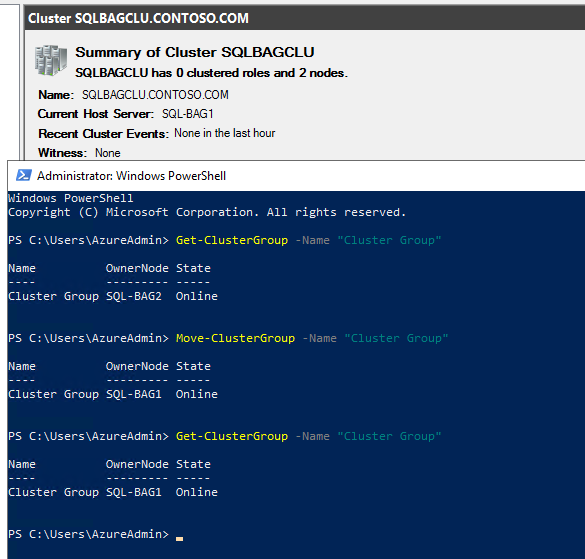
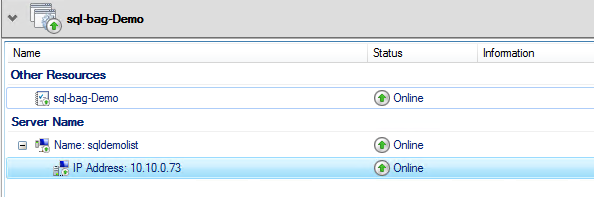
Step 4: Active Directory-Detached Cluster Failover Test
# Test cluster group failover
Get-ClusterGroup -Name "Cluster Group"
Move-ClusterGroup -Name "Cluster Group"
Current owner SQL-BAG2:
Successful cluster failover to SQL-BAG1:
Step 5: DNS Record Update (Optional)
# Update Cluster Name in DNS to ensure it has been registered within DNS Server.
Get-ClusterResource -Name "Cluster Name" | Update-ClusterNetworkNameResource
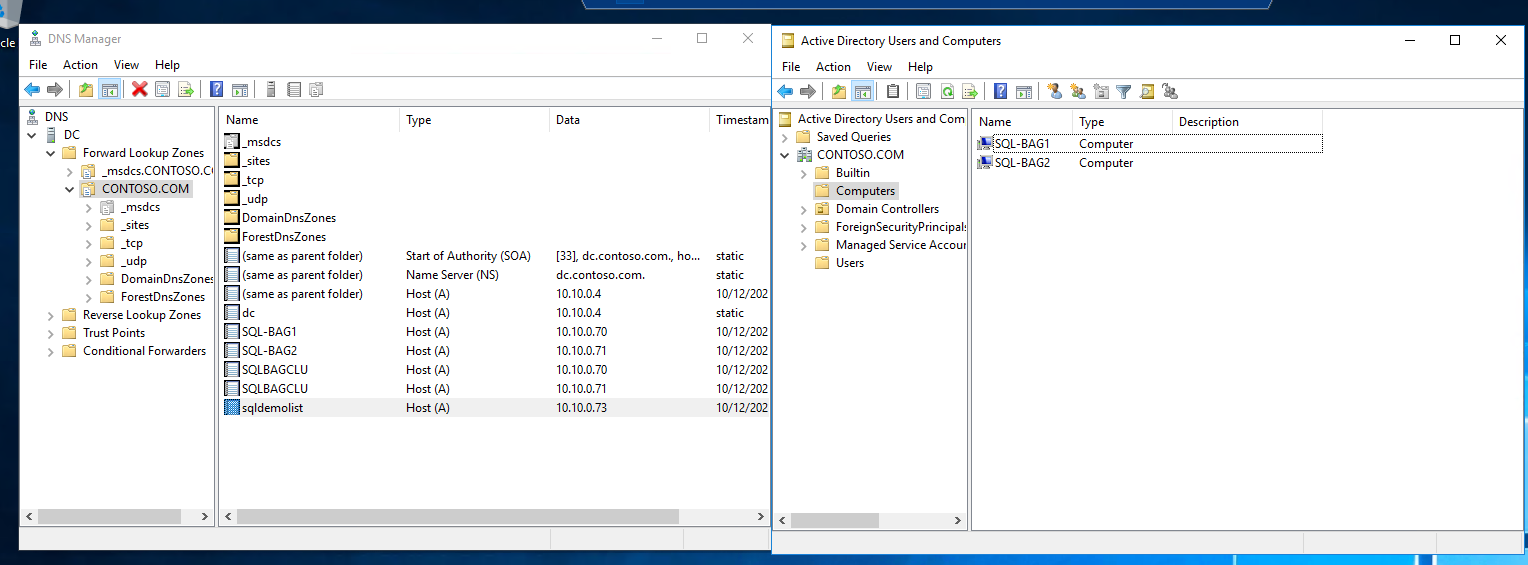
Step 6: Review DNS and Active Directory
Check DNS
Although static IP address was specified when creating the cluster, it has been ignored. This is a result of distributed network name (DNN) behaviour on Windows Server 2019 in Azure. Keep an eye out for a separate article on how to prevent this. However, the cluster record has same IP addresses of the participating nodes.
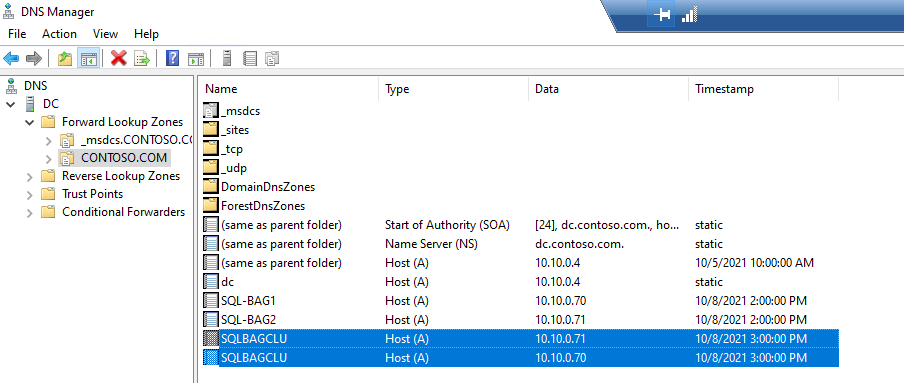
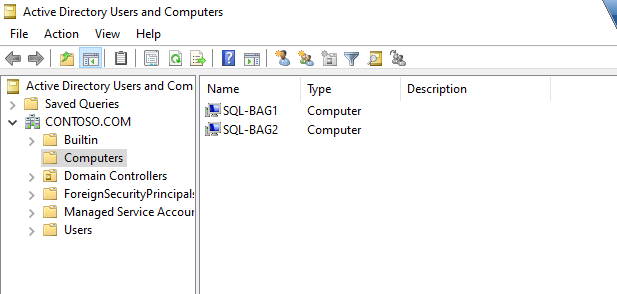
As intended for Active Directory Detached Cluster no objects are created within the Active Directory for the cluster. Therefore, Kerberos authentication is not supported.
Step 7: Verification and Enable of Dynamic Quorum
# Enable Dynamic Quorum (allow last-man standing)
Dynamic quorum is enabled by default in a Windows Server 2012 cluster and can be changed using the (Get-Cluster).DynamicQuorum Windows PowerShell cmdlet.
(Get-Cluster).DynamicQuorum = 1
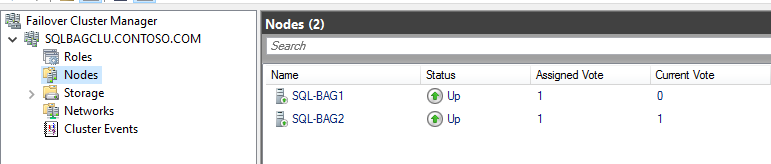
# Validate Vote
To check the current votes of a cluster, run the Get-ClusterNode Windows PowerShell cmdlet and the DynamicWeight property shows if the node has a vote or not.
Get-ClusterNode | ft ID, NodeName, NodeWeight, DynamicWeight, State -AutoSize
We can see that dynamic vote is allocated to SQL-BAG2 node. As the cluster only has two nodes, the odd number of voting is required to mitigate split brain scenario. Also, to keep cluster online should a node fail.
TIP: A commonly asked question here is if you have only two nodes in the cluster and are using node majority only, how does the dynamic quorum work. When there are only two nodes, one of the nodes loses its DynamicWeight so only one of the nodes now has a vote (this is chosen randomly). This ensures that if the second node crashes, the first node can stay active (giving you a 50/50 chance of surviving an unplanned failure of a node).

Now, I will validate if the dynamic quorum works as intended. But firstly, these are scenarios and how the dynamic quorum would behave.
Dynamic Quorum Scenarios
- If SQL-BAG2 is gracefully shut down, the cluster removes SQL-BAG2 current vote and gives SQL-BAG1 current vote and the cluster stays online with SQL-BAG1 (last man standing).
- If SQL-BAG1 is gracefully shut down, the cluster stays up with SQL-BAG2 (since it has the vote and is last man standing).
- If SQL-BAG1 and SQL-BAG2 lose communication, the cluster stays up with SQL-BAG2 (last man standing).
- If SQL-BAG2 goes down in an unplanned scenario, then the cluster goes down as SQL-BAG1 doesn’t have a current vote to survive. This would occur if dynamic quorum were not re-assigned in timely manner.
TIP: For the greatest protection from unplanned failure, always configure an additional witness.
The SQL-BAG2 node is gracefully shutdown and dynamic vote is given to node SQL-BAG1. The Cluster remains online.

Once SQL-BAG2 node is online, the DynamicWeight moves back to SQL-BAG2 as this is chosen randomly.

TIP: Did you know there are various default parameters that can be adjusted to make your new or existing cluster more resilient to failures and to make connection more seamless. Failing to adjust the default configurations for your requirements may lead to service outage or longer failover time.
How to deploy a SQL Server Basic Availability Group for Active Directory-detached cluster
Step 8: Install SQL Server with SQL Authentication and Configure.
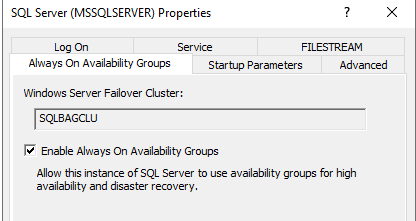
Step 9: Enable AlwaysOn Availability Group (A restart of service is required)
Step 10: Create Database Master Keys
# Create Database Master Key (DMK) on the SQL Server instances
create master key encryption by password = 'V£rY$trongPa55word!';
Step 11: Database Master Key validation
# Validate Database Master Key
select name, principal_id, symmetric_key_id, key_length, key_algorithm, algorithm_desc, create_date, modify_date
from sys.symmetric_keys
where name = '##MS_DatabaseMasterKey##’

Step 12: Create Certificate from File
Note: Self-Signed Certificate can also be used as alternative.
#Primary Instance
CREATE CERTIFICATE [SQL-BAG1_Cert]
FROM FILE = N'C:\Certificates\SQL-BAG1_BACKUP_Cert.cer'
WITH PRIVATE KEY (
FILE = N'C:\Certificates\SQL-BAG1_BACKUP_CERTIFICATE_PRIVATE_KEY.pvk',
DECRYPTION BY PASSWORD = 'V£rY$trongPa55word!'
);
GO
#Secondary Instance
CREATE CERTIFICATE [SQL-BAG2_Cert]
FROM FILE = N'C:\Certificates\SQL-BAG2_BACKUP_Cert.cer'
WITH PRIVATE KEY (
FILE = N'C:\Certificates\SQL-BAG2_BACKUP_CERTIFICATE_PRIVATE_KEY.pvk',
DECRYPTION BY PASSWORD = 'V£rY$trongPa55word!'
);
GO
Step 13: Validate Certificates
select name, certificate_id, principal_id, pvt_key_encryption_type_desc, issuer_name, expiry_date, start_date, key_length
from sys.certificates
where name like '%SQL-BAG1_Cert%' --SQL-BAG2_Cert

Step 14: Backup Certificates
#Primary
BACKUP CERTIFICATE [SQL-BAG1_Cert]
TO FILE = 'C:\Certificates\SQL-BAG1_BACKUP_Cert.cer'
WITH PRIVATE KEY ( DECRYPTION BY PASSWORD = 'V£rY$trongPa55word!' ,
FILE = 'C:\Certificates\SQL-BAG1_BACKUP_CERTIFICATE_PRIVATE_KEY.pvk' ,
ENCRYPTION BY PASSWORD = 'V£rY$trongPa55word!' );
#Secondary
BACKUP CERTIFICATE [SQL-BAG2_Cert]
TO FILE = 'C:\Certificates\SQL-BAG2_BACKUP_Cert.cer'
WITH PRIVATE KEY ( DECRYPTION BY PASSWORD = ' V£rY$trongPa55word!' ,
FILE = 'C:\Certificates\SQL-BAG2_BACKUP_CERTIFICATE_PRIVATE_KEY.pvk' ,
ENCRYPTION BY PASSWORD = 'V£rY$trongPa55word!' );
Step 15: For each replica create a SQL Server login for the other replicas
#Primary
create login [SQL-BAG2_login]
with password = 'V£rY$trongPa55word!';
#Secondary
create login [SQL-BAG1_login]
with password = 'V£rY$trongPa55word!';
Step 16: Create a database user for the login
#Primary
create user [SQL-BAG2_user]
for login [SQL-BAG2_login];
#Secondary
create user [SQL-BAG1_user]
for login [SQL-BAG1_login];
Step 17: Copy & Restore Certificates
#Primary
CREATE CERTIFICATE [SQL-BAG2_Cert]
FROM FILE = N'C:\Certificates\SQL-BAG2_BACKUP_Cert.cer'
WITH PRIVATE KEY (
FILE = N'C:\Certificates\SQL-BAG2_BACKUP_CERTIFICATE_PRIVATE_KEY.pvk',
DECRYPTION BY PASSWORD = 'V£rY$trongPa55word!'
);
GO
#Secondary
CREATE CERTIFICATE [SQL-BAG1_Cert]
FROM FILE = N'C:\Certificates\SQL-BAG1_BACKUP_Cert.cer'
WITH PRIVATE KEY (
FILE = N'C:\Certificates\SQL-BAG1_BACKUP_CERTIFICATE_PRIVATE_KEY.pvk',
DECRYPTION BY PASSWORD = 'V£rY$trongPa55word!'
);
GO
Step 18: Grant user permission on certificate
#Primary
GRANT VIEW DEFINITION ON CERTIFICATE::[SQL-BAG2_Cert] TO [SQL-BAG2_user]
#Secondary
GRANT VIEW DEFINITION ON CERTIFICATE::[SQL-BAG1_Cert] TO [SQL-BAG1_user]
Step 19: Create and validate endpoint on SQL Server instances
#Primary
create endpoint database_mirroring
state = started
as tcp (
listener_port = 7022,
listener_ip = all
)
for database_mirroring (
authentication = certificate [SQL-BAG1_Cert],
encryption = required algorithm aes,
role = all
)
#Secondary
create endpoint database_mirroring
state = started
as tcp (
listener_port = 7022,
listener_ip = all
)
for database_mirroring (
authentication = certificate [SQL-BAG2_Cert],
encryption = required algorithm aes,
role = all
)
Step 20: Review endpoint
select name, endpoint_id, principal_id, protocol_desc, type_desc, state_desc, role_desc, is_encryption_enabled, connection_auth_desc, encryption_algorithm_desc
from sys.database_mirroring_endpoints

Confirm that authentication is via certificate (connection_auth_desc).
Step 21: Grant access to the endpoint to the logins
#Primary
use [master]
GO
GRANT CONNECT ON ENDPOINT::[database_mirroring] TO [SQL-BAG2_login]
GO
use [master]
GO
GRANT VIEW DEFINITION ON ENDPOINT::[database_mirroring] TO [SQL-BAG2_login]
GO
#Secondary
use [master]
GO
GRANT CONNECT ON ENDPOINT::[database_mirroring] TO [SQL-BAG1_login]
GO
use [master]
GO
GRANT VIEW DEFINITION ON ENDPOINT::[database_mirroring] TO [SQL-BAG1_login]
GO
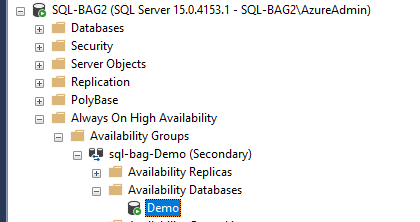
Step 22: Create Basic Availability Group and Add Database on Primary
#Complete for each user database
use [master];
go
create availability group [sql-bag-Demo]
with (automated_backup_preference = primary,
db_failover = off,
dtc_support = per_db,
basic)
for database [Demo]
replica on N'SQL-BAG1' with (endpoint_url = N'TCP://SQL-BAG1.CONTOSO.COM:7022',
failover_mode = manual,
availability_mode = Asynchronous_commit,
seeding_mode = automatic,
primary_role(allow_connections = all),
secondary_role(allow_connections = no)
),
N'SQL-BAG2' with (endpoint_url = N'TCP://SQL-BAG2.CONTOSO.COM:7022',
failover_mode = manual,
availability_mode = Asynchronous_commit,
seeding_mode = automatic,
primary_role(allow_connections = all),
secondary_role(allow_connections = no)
);
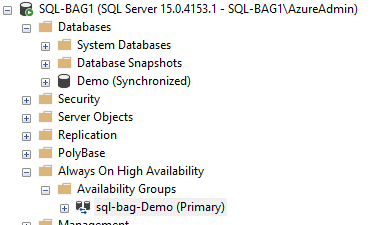
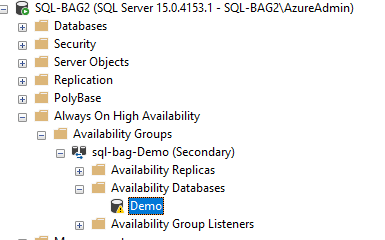
The resource will be visible within the failover cluster.

Step 23: Join Secondary Replica to Basic Availability Group on Secondary
alter availability group [sql-bag-Demo] join;
Step 24: Grant permissions to logins
#Primary
GRANT ALTER ANY AVAILABILITY GROUP TO [SQL-BAG2_login]
GO
use [master]
GO
GRANT CONNECT ANY DATABASE TO [SQL-BAG2_login]
GO
use [master]
GO
GRANT VIEW ANY DATABASE TO [SQL-BAG2_login]
GO
use [master]
GO
GRANT VIEW SERVER STATE TO [SQL-BAG2_login]
GO
#Secondary
GRANT ALTER ANY AVAILABILITY GROUP TO [SQL-BAG1_login]
GO
use [master]
GO
GRANT CONNECT ANY DATABASE TO [SQL-BAG1_login]
GO
use [master]
GO
GRANT VIEW ANY DATABASE TO [SQL-BAG1_login]
GO
use [master]
GO
GRANT VIEW SERVER STATE TO [SQL-BAG1_login]
GO
Step 25: Allow Automatic Seeding
alter availability group [sql-bag-demo]
grant create any database;
Step 26: Join Database to Basic Availability Group
ALTER DATABASE [Demo] SET HADR AVAILABILITY GROUP = [sql-bag-Demo];
Step 27: Create Availability Group Listener
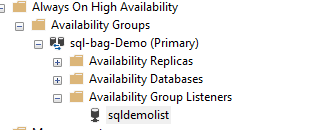
USE [master]
GO
ALTER AVAILABILITY GROUP [sql-bag-Demo]
ADD LISTENER N'bag-demolist' (
WITH DHCP
ON (N'10.10.0.73', N'255.255.255.192'
)
, PORT=8433);
GO
This figure illustrates how record for the listener is only created within the DNS and not Active Directory.
The listener resource is visible within Failover Cluster Manager and is a dependency of the availability group resource.
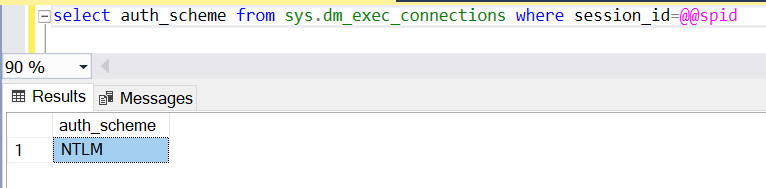
Step 28: Verify authentication type
The authentication type should be NTLM, when connected to the availability group listener as Kerberos is not supported. To check you can use the DMV sys.dm_exec_connections with the column auth_scheme .
select auth_scheme from sys.dm_exec_connections where session_id=@@spid
If NTLM is used, you should see "NTLM".
TIP: When an application connects it resolves the virtual network name via DNS and would return all available IP addresses. This would attempt connectivity to each of the IP addresses only once a timeout occurs to the first available IP Address it would check connectivity to another IP address; upon establishing successful connection it would either connect to the primary replica or secondary replica. Albeit, to resolve timeout issues MultiSubnetFailover=True is recommended parameter to include in application connection string. Once enabled the application would attempt to connect to both IP addresses simultaneously.
Conclusion
As demonstrated, with the Windows Active Directory Detached Cluster it is possible to deploy SQL Server Basic Availability Group with SQL Server authentication supported. There are various limitations and pre-requisites to consider. Also, changes within the Window server versioning, influences the deployments. Therefore, careful planning and design is required including implementation and configuration changes; to ensure the solution works as intended. If you would like to discuss business continuity options for your environment or require help with implementation the team at Coeo can help.
Disclaimer: You may notice that best practices are not followed as this is for demonstration purposes only and to reduce the cost. Therefore, for all production configurations please follow recommended best practices.