
Recently we have helped a number of customers with moving system and user databases from one drive to another. We also regularly receive questions regarding how to do this safely and minimising risks associated. As such, we have produced a step-by-step guide with best practice recommendations and some useful scripts to speed up the process. The guide covers each system database and a user database, as well as what to do when things go wrong.
Remember to take backups of both user and system databases before carrying out any maintenance.
Before we move any files it is always good to get an idea of where everything is. You can do this by using the following SQL:
This will show you where all of your system database files are at the time of execution as well as the command to put them back to their original location (The output of this is worth saving).
TempDB
In order to move TempDB, please follow the steps below:
1. Change the File location
As TempDB is recreated every time SQL server restarts, moving it is reasonably easy. All you have to do is update the file location of each of the log and datafiles (In this case for simplicity we only have 2 data files and 1 log file) as follows although you may have more:
ALTER DATABASE [tempdb] MODIFY FILE (NAME = tempdev, FILENAME = 'M:\Tempdb\tempdb.mdf');
ALTER DATABASE [tempdb] MODIFY FILE (NAME = templog, FILENAME = 'M:\Tempdb\templog.ldf');
ALTER DATABASE [tempdb] MODIFY FILE (NAME = temp2, FILENAME = 'M:\Tempdb\tempdb2.ndf');
2. Restart the SQL Server Instance
When you then restart the instance, the files will be recreated in the new specified location.
3.Delete the old data files from the previous location
As TempDB is recreated every time SQL Server starts, the previous data and log files will need to be removed manually.
MSDB & Model
In order to move the MSDB and Model databases, please follow the steps below:
1. Change the File location
Much like TempDB, before we can move the files we need to change their location in SQL Server.
Script:
ALTER DATABASE [model] MODIFY FILE (NAME = modeldev, FILENAME = 'K:\Data\model.mdf');
ALTER DATABASE [model] MODIFY FILE (NAME = modellog, FILENAME = 'L:\Logs\modellog.ldf');
ALTER DATABASE [msdb] MODIFY FILE (NAME = MSDBData, FILENAME = 'K:\Data\MSDBData.mdf');
ALTER DATABASE [msdb] MODIFY FILE (NAME = MSDBLog, FILENAME = 'L:\Logs\MSDBLog.ldf');
Output:
The file "modeldev" has been modified in the system catalog. The new path will be used the next time the database is started.
The file "modellog" has been modified in the system catalog. The new path will be used the next time the database is started.
The file "MSDBData" has been modified in the system catalog. The new path will be used the next time the database is started.
The file "MSDBLog" has been modified in the system catalog. The new path will be used the next time the database is started.
2. Stop the SQL Service
This can be done using the SQL Server Configuration manager or a “NET STOP” command, whichever you feel more comfortable with.
3. Copy the files to the new location
We recommend copying these rather than moving to ensure that if there are any issues during the move, the original data file has more chance of being in a healthy state and therefore can still be used to recover.
4. Restart the SQL Service
5.This new file locations should be displayed in the results below:
SELECT DB_NAME(database_id) AS [Database]
, name AS [LogicalName]
, type_desc AS [FileType]
, physical_name AS [FilePath]
FROM SYS.master_files
WHERE database_id <= 4;
6. Remove the old files once confirmed that the instance starts successfully.
Master
The process to move the master database is very different from other databases as the file location is stated as a startup parameter for each SQL Instance installed.
As with other databases, we recommend saving the existing location before starting so that you can return to this in event of any issues.
- Open SQL Server Configuration Manager and under the SQL Services, right click > Properties for MSSQLSERVER > Startup Parameters
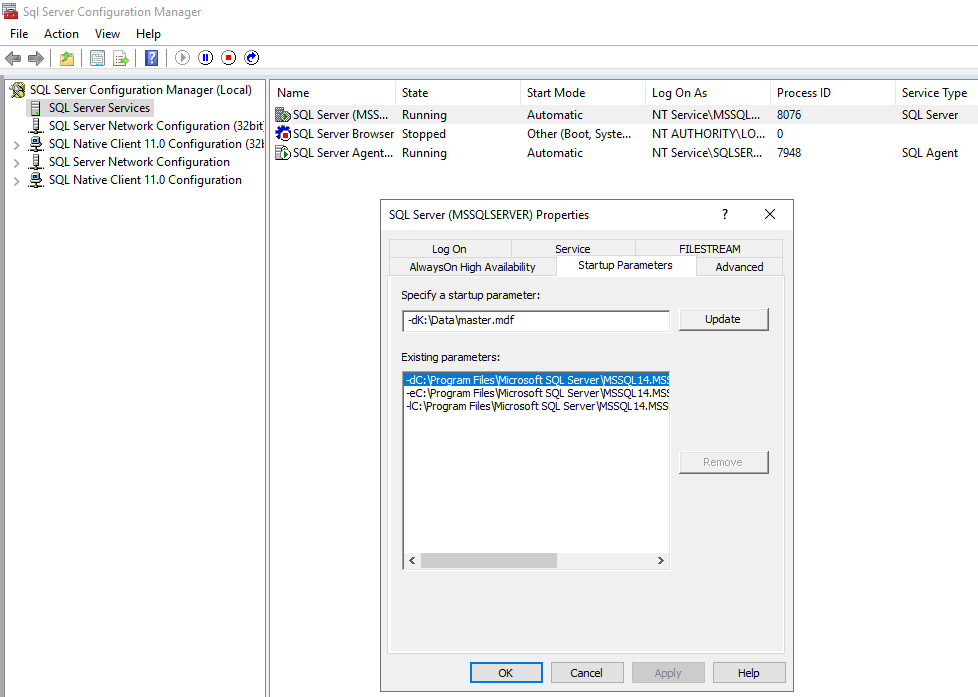
- From the "Existing Parameters" section shown above, make a note of both the -d and -l parameters.
- In "Existing Parameters", the -d trace flag relates to the master databases data file location. Update the -d parameter to your new data file location.
- In "Existing Parameters", the -l trace flag relates to the master databases log file location. Update the -l parameter to your new log file location.
- Stop the SQL Service.
- Copy the master.mdf and mastlog.ldf files to the new location.
We recommend copying these rather than moving to ensure that if there are any issues during the move, the original files can still be used to recover.
- Restart the SQL Server Service.
- Confirm that the SQL Service starts.
User Database
- Change the File location
Much like the TempDB, Model and MSDB databases, before we can move the files we need to change their location in SQL Server. This script will generate an alter database command for each database. You will need to change the file path to the location required.
SELECT DB_NAME(database_id) AS [Database]
, name AS [LogicalName]
, type_desc AS [FileType]
, physical_name AS [FilePath]
FROM SYS.master_files
WHERE database_id > 4
ORDER BY database_id ASC, type_desc DESC;
- Either stop the SQL Service or set the database to offline mode with the following command:
SELECT DB_NAME(database_id) AS [Database]
, 'ALTER DATABASE ' + DB_NAME(database_id)
+ ' SET OFFLINE WITH ROLLBACK IMMEDIATE;'AS OfflineCommand
, 'ALTER DATABASE ' + DB_NAME(database_id)
+ ' SET ONLINE;'AS OnlineCommand
FROM sys.databases
WHERE database_id > 4;
- Copy the files to the new location.
We recommend copying these rather than moving to ensure that if there are any issues during the move, the original data and log files can still be used to recover.
- Restart the SQL Service or bring the database online using the previous script.
- This new file locations should be displayed in the results below:
SELECT DB_NAME(database_id) AS [Database]
, name AS [LogicalName]
, type_desc AS [FileType]
, physical_name AS [FilePath]
FROM SYS.master_files
WHERE database_id > 4
ORDER BY database_id ASC, type_desc DESC;
- Remove the old files once confirmed that the instance starts successfully.
Change Default data and log file path
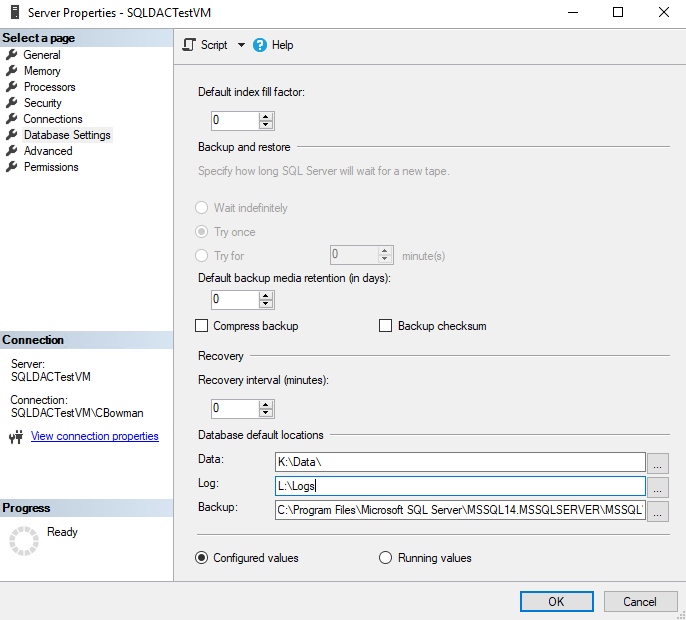
- Change the database default location (Right Click Instance, Properties, Database Settings, Database Default Locations)
- Restart the SQL Service.
Things to be aware of:
- When changing the default log and data locations you can use xp_instance_regwrite however, we recommend using the GUI as per Microsoft documentation.
- If any of the files for the TempDB database are configured to be too large for the drive while moving, SQL Server will fail to start up. For example, if you have a 20 GB drive and you have configured a TempDB data or log file to be 30 GB before moving the file and restarting SQL, the instance will fail to start.
- If any of the system data files are moved to a location that doesn’t exist SQL Server will fail to start up.
- If a user database file is moved to a location that doesn’t exist, the database will start up in “Recovery Pending” mode.
What to do when things go wrong
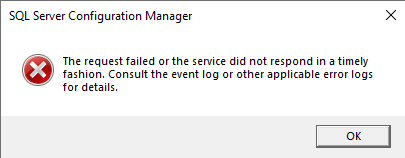
In the follow example we have changed TempDB’s data file location to a non-existent folder. When we try and start SQL it fails and we receive the following error:
And we can see in the event log:
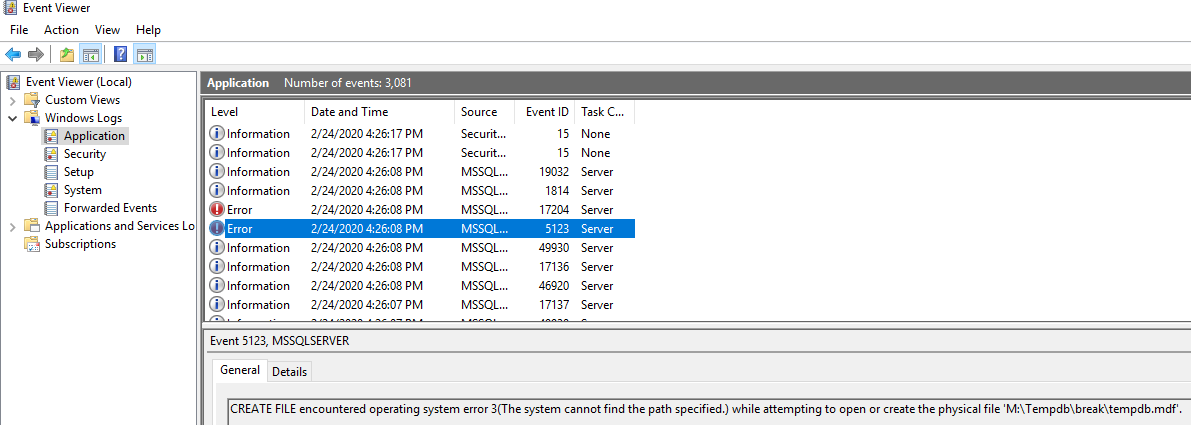
Error message: CREATE FILE encountered operating system error 3(The system cannot find the path specified.) while attempting to open or create the physical file 'M:\TempDB\break\TempDB.mdf'.
The following steps will walk you through how to start up SQL Server in Single User mode and how to run “ALTER DATABASE” commands to resolve the problem and bring the SQL instance back online.
- Open a command prompt (Win + R and type “cmd”) with admin privileges
- NET START MSSQLSERVER /f /T3608
This will start up SQL Server in single user mode due to the /f startup parameter. In this case MSSQLServer is the name of my instance and trace flag T3608 prevents SQL Server from automatically starting and recovering any database except the master database.
- Connect to the SQL Server instance using the following command (-U is username, -P is Password, - s is Instance name. Please note the use of capital letters for U and P and not s):
Windows Authentication:
sqlcmd -s MSSQLSERVER -E
SQL Login:
sqlcmd -s MSSQLSERVER -U Test -P Test
- If you receive the following error, as we are connecting using single user mode, it means that another connection has connected before you:

- If you had the issue in step 4, stop the instance and connect again:
NET STOP MSSQLSERVER
- Once connected you will need to alter the file location to the correct location:
ALTER DATABASE TempDB MODIFY FILE ( NAME = tempdev, FILENAME = 'M:\TempDB\TempDB.mdf');
GO;
EXIT

- Now stop and start SQL Server again
NET STOP MSSQLSERVER
NET START MSSQLSERVER
- You should now be able to connect using SSMS. If SQL fails to start, review the error log again and repeat steps until SQL starts correctly.
Summary
Although you will likely only have to move database files a handful of times in most careers, it is worth ensuring you know how to get SQL back online and running when something inevitably does go wrong. Hopefully you’ve found the above scripts and information useful however, if you feel we have missed anything, please don’t hesitate to let us know.
Useful Links
Christian is a Data Platform Specialist in Coeo's Dedicated Support team. Find out more about this service on the link below: