Welcome to part two of my shallow dive into the PDW. In this section we take a look at the options available for ETL with the appliance. Here we will cover the following topics:
- DWLoader.
- SSIS and PDW.
DWLoader
The DWLoader application is a bit like the PDW version of BCP, it is a command line application that is all about very fast import and export of flat files that are logically structured. The tool can be used via a script or the command line to import flat files to the appliance or export data to flat files off the appliance. Example syntax of the DWLoader application:
dwloader.exe -i ${loadfile} -m -fh 1 -M {mode} -b 100000 -rt value -rv 1000 -R ${loadfile}.rejects -E -e ASCII -t ‘,‘ -r \r\n -S $server -U
$user -P $password -T {targetdatabase}${table}
Key switches:
- –i – the location of one or more source files to load.
- –M – specifies the load mode, options are fastappend, append, upsert or reload data. The default mode is append. To use fastappend you must specifiy –m, which is the multi-transaction option. The key difference to append and fast append is that the latter doesn’t use a temporary table.
- –fh – the number of lines to ignore at the beginning of the file (ie. Header rows).
- –b – sets the batch size, the default is 10,000 rows.
- –rv – specifies either the number of rows or % of data allowed to fail before halting the load (use of –rt sets whether this is a value or %).
- –R – this is the load failure file, if the file already exists it will be overwritten.
- –E – will convert empty strings to NULLL. The default is not to convert.
- –e – is the character encoding, ASCII is the default but other options are UTF8,UTF16 or UTF16BE.
- –t – specifies the field delimiter.
- –r – is the row delimiter.
- –S – sets the target appliance normally an IP address.
- –U and –P – is the username and password for the appliance (until the next PDW update PDW only supports SQL security so this would be your SQL username and password)
- –T – is the three part name for the destination table e.g. dbname.dbo.table1 (dbo is the only schema supported in the current version of PDW)
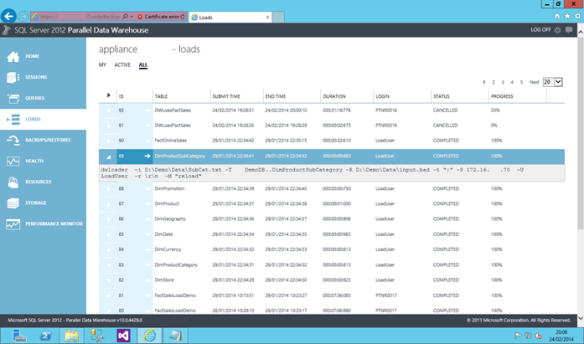
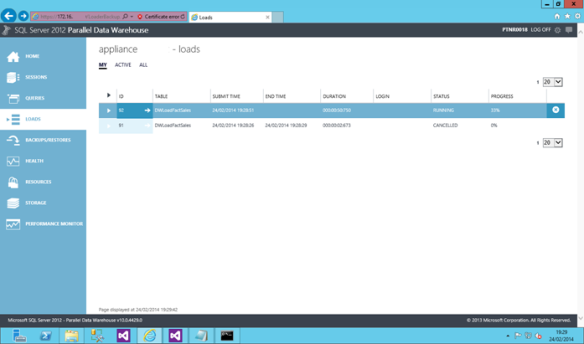
Once the import or export is started there is not much to see however you can track progress through the PDW dashboard.
A common problem with the DWLoader tool is that it isn’t able to work out the file format of the flat file (ie. Unicode or UTF-8). If you aren’t sure about the file type open up the file in SSIS Import/Export wizard and it will allow you to work out the format.
SSIS and PDW
First let’s remind ourselves how where SSIS fits in the PDW world:
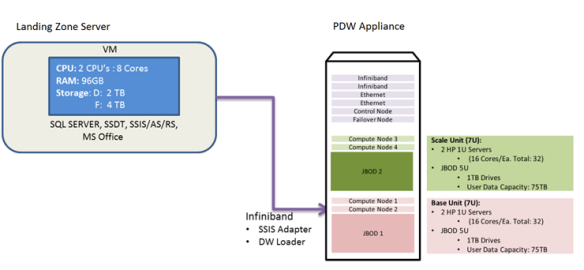
The important point the diagram shows is that SSIS runs on the landing zone server NOT on the PDW directly. This is quite critical because, whereas in traditional ETL solutions you will look to SSIS to manage all of the transformations, when you have a PDW appliance as your database you will want to do that work on the actual appliance. This is also important to limit the effect on memory by pulling large data volumes into the SSIS data flow. It is much better to use SSIS as the control flow for the ETL solution and doing the advanced transformations of the data on the PDW.
To use SSIS with the PDW you use the same tools and processes as you would against normal SQL Server. Visual Studio with SSDT is used to create an SSIS project. Within the project you can specify a source adapter that will be an OLE DB source pointing to the PDW; however you will see that SSIS thinks this is a normal SQL Server source because the icons for the tables do not show as distributed or replicated, just tables. This is by design and it is good practice to build your source query as a stored procedure on the PDW so that you can test it before using in the SSIS project. The big difference in SSIS is the destination adapter, this is PDW specific and an example is shown in the diagram below:
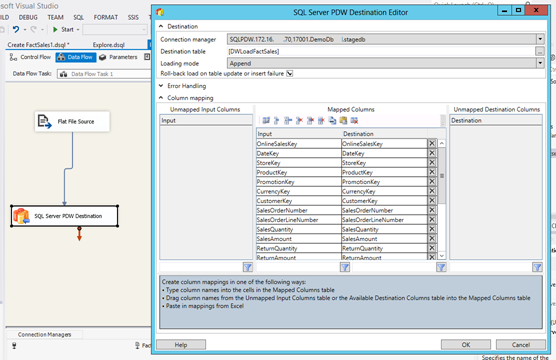
Using the PDW destination adapter it is critical to make sure the source columns match the data type of the destination columns; the adapter is not flexible or forgiving like other destination adapters in SSIS (i.e. SQL Server Destination), it won’t do any automatic type conversion. Important settings when using the PDW destination adapter include:
-
Connection Manager – you will need to create a new, PDW specific, connection manager:
- Servername will be the appliance name and port number or the appliance IP and port number.
- User and password will be your SQL Server PDW login information.
- Destination database name is the target database on the PDW.
- Staging database name is the stage database you want to use, if using FastAppend this must be empty.
- Destination Table – the table you wish to load the data into.
-
Loading Mode – if the loading mode is fast append make sure you un-select “roll-back load on table update or insert failure”
- By unchecking this box, load from the staging table to a distributed destination table are performed in parallel across the distributions; this is quick but not transaction safe. It is the same as using the –m switch in DWLoader.
- Checking the box loads data serially across distributions within each compute node and in parallel across the compute nodes. This is slower but is transaction safe.
- Finally you can map your columns from input to destination – HOWEVER MAKE SURE YOU MATCH DATA TYPES!
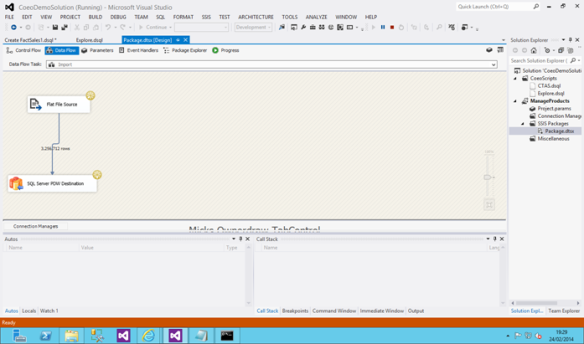
Below is an example of the package running to import a simple file:
You can then follow the performance of the load through the PDW dashboard just as with the DWLoader:
In summary, when dealing with ETL on the PDW, push as much of the data transformations to the PDW as possible. Use tools not normally available in SQL Server or SSIS such as CTAS (Create Table As Select) and try and limit the use of the Update statement. Understanding that SSIS works by pulling data from the data source adapter into the memory on the SSIS server and runs it there, is critical to manage memory and performance of SSIS.
My suggestion for using SSIS with PDW is to use it for the control flow and for any basic data preparation for types not supported on the appliance, for example XML data type. Then use the power of the PDW to do the advanced transformations. In a recent POC for a customer we were loading around 300gbs of data in less than one hour using DWLoader and then transforming 2 million XML documents into a relational data warehouse using SSIS and PDW stored procedures. We did have an issue with no Merge statement support in PDW so to upsert into a dimension table we created a “mega-merge” statement using the CTAS function. In Part 3 of this series I will cover how that worked and also how partitions are managed on the PDW.
If you have any comments or questions please feel free to post them here for me or tweet me at @mattasimpson…

![]()